By Kevin Fons, Apr 28, 2020
If you do any business across borders or if your home country uses multiple currencies, keeping up with changing currency exchange rates is both crucial and, at least traditionally, highly tedious. If your business is still using manual methods to update your exchange rates and you are using Microsoft Dynamics 365 Business Central or NAV, there is a quick and easy way to automate this process.
Starting with NAV 2016, Microsoft added functionality to update exchange rates using an internet XML feed. This process involves creating an Exchange Rate Service and then scheduling it using the Job Queue functionality. Once you set it up, the process will retrieve exchange rates and update them on a schedule automatically.
Setup the Exchange Rate Service
Let’s walk through the set-up process step by step.
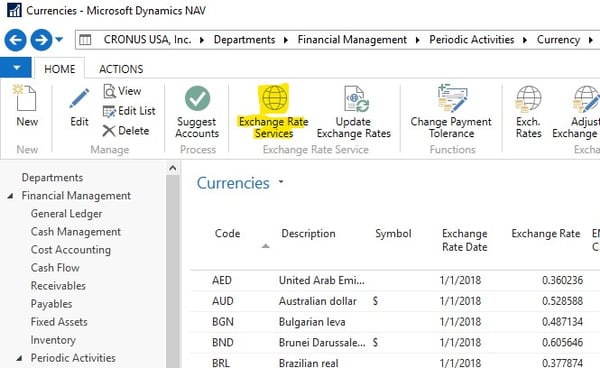
From the Currencies Page, select Exchange Rate Services on the Ribbon.
Open the page and select New.
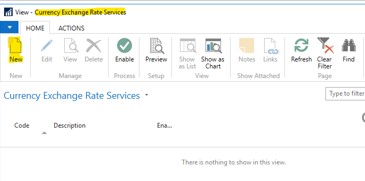
In this window, put in the following details for your new Currency Exchange Rate Service:
- Add a Code and Description
- Enter / Paste this Service URL: https://www.floatrates.com/daily/usd.xml
- Set Service Provider: Floatrates.com
- Enter / Paste this URL for Terms of Service: http://www.floatrates.com/faq.html

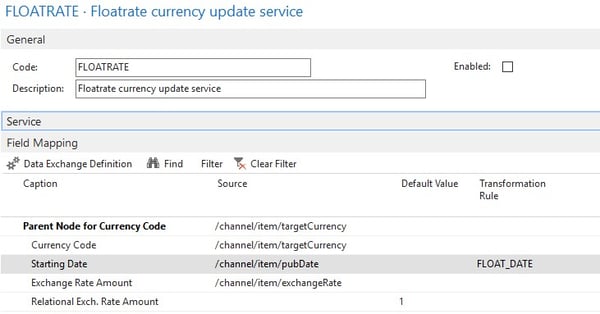
Next, open the Field Mapping area and populate the Source, Default Value, and Transformation Rule columns as follows:
- Source Field:
- Parent Node for currency code: /channel/item/targetCurrency
- Currency Code: /channel/item/targetCurrency
- Starting Date: /channel/item/pubDate
- Exchange Rate Amount: /channel/item/exchangeRate
- Default Value:
- Relational Exch. Rate Amount: 1
- Transformation Rule:
- Create A New Service (FLOAT_DATE). See Below.
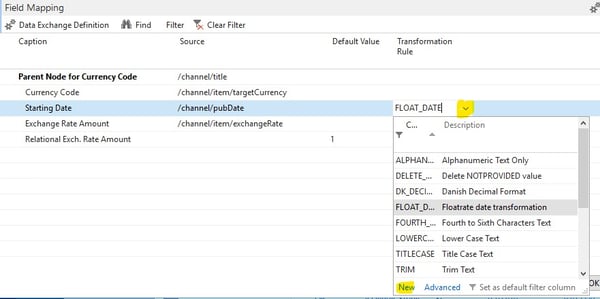
Next, you will need to create a New FLOAT_DATE transformation rule to handle the dates in the XML format. Click the dropdown for the Starting Date Transformation Rule and press New.
Fill out your New Rule form as follows:
- Code: FLOAT_DATE
- Description: Floatrate date transformation
- Transformation Type: Substring
- Next Transformation Rule: US_DATE_FORMAT
- Starting Text: “ ” (THIS IS A SPACE NOT BLANK)
- Ending Text: “ GMT” (This is a Space, then GMT)

Press OK to exit the rule. Then select this new Transformation rule on your FLOATRATE service for the starting date field mapping.
Enable the FLOATRATE Service
Now that you have created the service, you need to enable it. Press the Enable Button, which will create a job queue entry (if it does not in your version you will need to manually create a Job Queue Entry). You should get a message to open the Job Queue Entry created.

Review and update the Job Queue Entry and set to Ready. Then, make any changes you would like to the Job Queue entry (add a description, set the starting time, days to run, etc.). Set the No. of Minutes between runs to 1440 (24 hours).
Note that the Job Queue Entry must be in Hold status to edit.
Set Status to Ready to schedule the Job Queue Entry when you are finished editing.
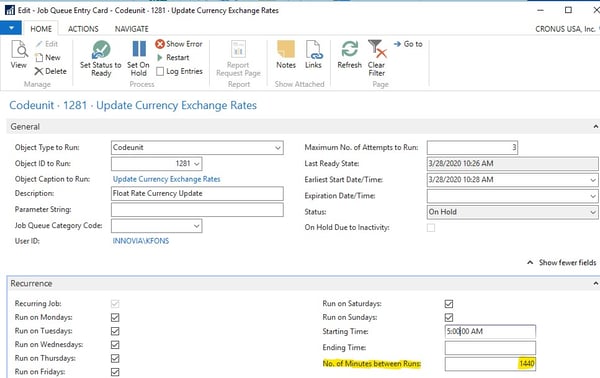
Check your Service to see the results:
Now that you have set up and enabled your service, open the Currency Exchange Services page (you can get there from the currencies page the same way you did in step 1).
Press the Preview button to see the Log of the currency updates performed.
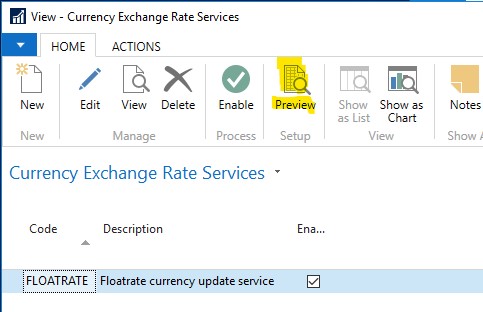
Here’s an example of what your currency exchange rate updates page will look like.
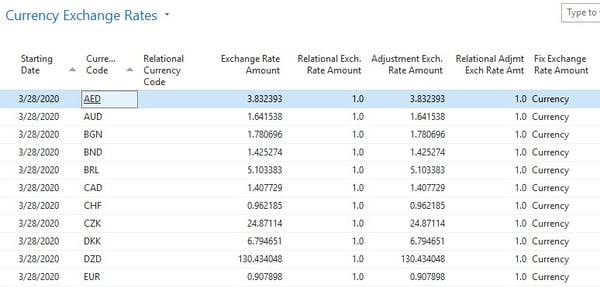
And here is an example of the corresponding table of currencies you will generate.

Conclusion
I hope that this quick tutorial will help you run your business more efficiently by updating your currency exchange rates without the need for manual upload. This process is one simple step you can take to fully utilize the power of your Microsoft Dynamics 365 Business Central or NAV system.


